Aperture (ƒ/stop)
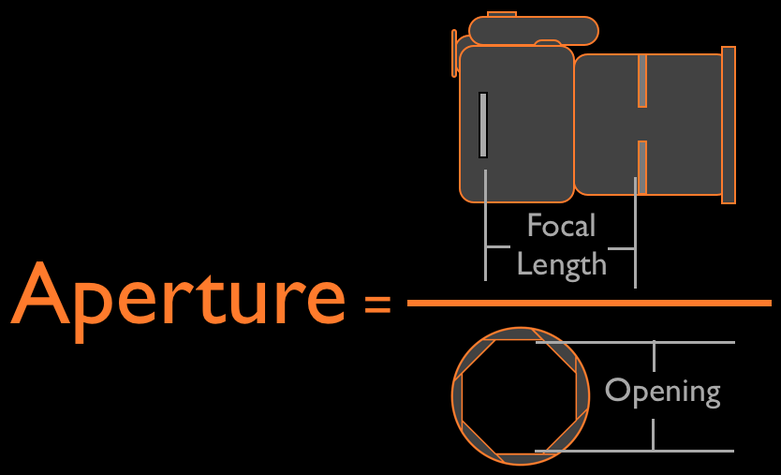
When looking at lenses there are two numbers to look for: Focal Length and Aperture. The focal length is displayed by a number followed by "mm", e.g., 50mm, 85mm, 18-200mm etc... I highly recommend you read what I wrote about focal length if you are not familiar with it by clicking HERE. Most of the time the aperture is shown as a ratio like 1:1.8, 1:2.8, 1:3.5 - 5.6. It can also be shown as an "ƒ" followed by a number, e.g., ƒ/1.8, ƒ/2.8, ƒ/3.5.-5.6. Sometimes aperture is shown simply as ƒ3.5 without the "/" in the middle. These numbers should be on all lenses of cameras. I have even seen them on some phone cameras as well. The aperture number describes the ratio between the size of the opening (created by the lens diaphragm) and the focal length. This ratio is illustrated below.
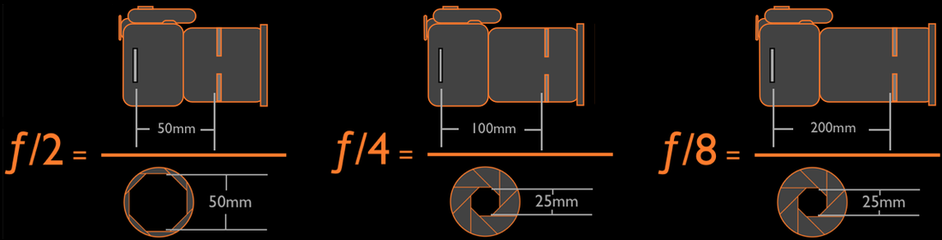
On a lens, the aperture marking shows the largest aperture that lans can achieve. A 50mm 1:1.8 means the largest aperture possible is 1.8. Many zoom lenses have an aperture range. A zoom lens may look like this 28 - 75mm 1:3.5 - 5.6. This means at 28mm the biggest aperture possible is 3.5 and at 75mm the biggest aperture possible is 5.6. This is because as the length of the lens increases the opening stays the same. Look at the last two examples above to see an illustration of this.
The core function of the aperture number is to give you an idea of how much light is being passed through the lens to the film plane or digital sensor. As you can see in the above image, the smaller the ƒ number, the larger the opening thus more light is being passed. An ƒ/2 allows more light than ƒ/4 witch allows more light than ƒ/5.6 and so on.
The cool thing is how the ratio is consistent regardless the focal length of the lens or the size of the opening. A lens at 200mm with an aperture set at f/2.8 allows the same amount of light to pass through it as a 12mm lens with an aperture set at 2.8. The difference being that the opening inside the 200mm lens is will need to be much bigger than the 12mm lens.
ƒ/stop
Most likely you are used to hearing the word aperture to describe something that is also called ƒ/stop. ƒ/stop is the more technical term for aperture. It comes from the day when the opening was controlled by metal plates called "stops". These metal plates had different size holes in them and when photographers wanted more or less light for the photo, they changed the metal plate. As time progressed, and camera lenses became more sophisticated, the metal plates were no longer needed but the term ƒ/stop stayed. Today, Both can be used interchangeably and most people in photography will know what you are talking about.
Stop up/down
It is not uncommon to hear people say "stopping down" or "stopping up". This simply means changing the size of their aperture. Stopping down refers to making the opening smaller while stopping up means making the opening bigger. One full stop in either direction will allow twice the amount of light in or half as much light in deepening on the direction. Therefore going from an ƒ/4 to ƒ/2.8 will allow twice as much light to pass through the lens. This is 1 full stop up. Likewise, going from ƒ/4 to ƒ/8 is stopping down 2 full stops and only 1/4 of the light will pass through the lens.
Below is a chart that will help you understated stops.
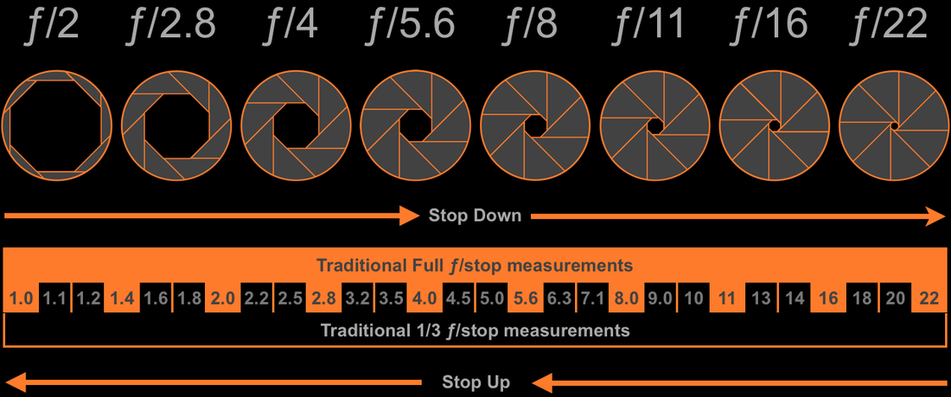
The above image should help illustrate how stopping works. The smaller the number is the more light can reach the film plane or digital sensor, thus stopping up. The reverse is stopping down. Many cameras allow someone to stop up or down in 1/2 or 1/3 increments. This means there are numbers interjected between the traditional full stop marks that allow increasing/decreasing the amount of light by an additional 50% or 33% respectively. Going from an aperture of ƒ/3.2 to ƒ/4.5 is stopping down one full stop as well. Because at ƒ/3.2 there is twice as much light passing through the lens than there is at ƒ/4.5 even though these two apertures are not on the tradition full ƒ/stop scale.
All of this is very important when determining what shutter speed to use for capturing a picture. In short, the larger the aperture, the more light will come through the lens, the faster the shutter speed can be.
Depth of Field (DOF)
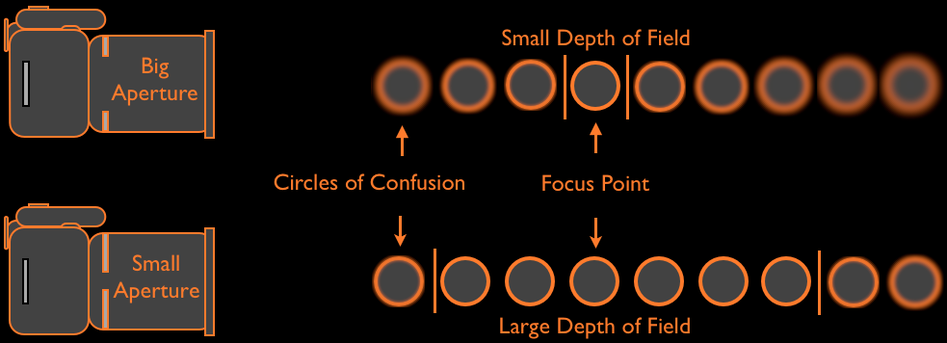
Beyond the amount of light the lens passes to the film plane or digital sensor, there is another very important aspect to selecting an aperture. This is called Depth of Field (DOF). DOF is the term used to describe what is in and out of focus on a picture. Larger apertures give a "smaller" the DOF; less is in focus. Likewise, the smaller the aperture, the larger the DOF; more is in focus. Some people use "deep" and "shallow" instead of "large" and "small" to describe DOF and both are acceptable.
DOF is measured from the focus point (focal plane) on the picture outward in a forward and backward direction. From that focal point, anything that is in front of it or behind it will be in focus up to a certain point. Also, the focal point (focal plane) is not dead center in the DOF range. It is actually closer to the front. Keep this in mind when selecting what aperture you want as to capture the entire subject and nothing else.
Below I have a diagram showing you what I mean along with some pictures to illustrate this in practice.
All of this is very important when determining what shutter speed to use for capturing a picture. In short, the larger the aperture, the more light will come through the lens, the faster the shutter speed can be.
Depth of Field (DOF)
Beyond the amount of light the lens passes to the film plane or digital sensor, there is another very important aspect to selecting an aperture. This is called Depth of Field (DOF). DOF is the term used to describe what is in and out of focus on a picture. Larger apertures give a "smaller" the DOF; less is in focus. Likewise, the smaller the aperture, the larger the DOF; more is in focus. Some people use "deep" and "shallow" instead of "large" and "small" to describe DOF and both are acceptable.
DOF is measured from the focus point (focal plane) on the picture outward in a forward and backward direction. From that focal point, anything that is in front of it or behind it will be in focus up to a certain point. Also, the focal point (focal plane) is not dead center in the DOF range. It is actually closer to the front. Keep this in mind when selecting what aperture you want as to capture the entire subject and nothing else.
Below I have a diagram showing you what I mean along with some pictures to illustrate this in practice.

Above is ƒ/2
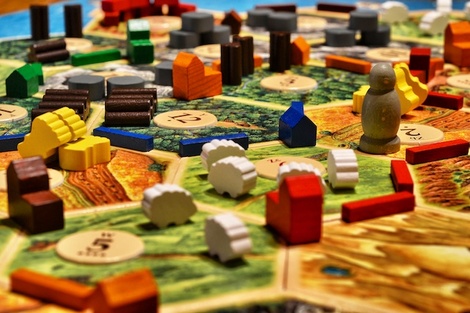
Above is ƒ/8
|
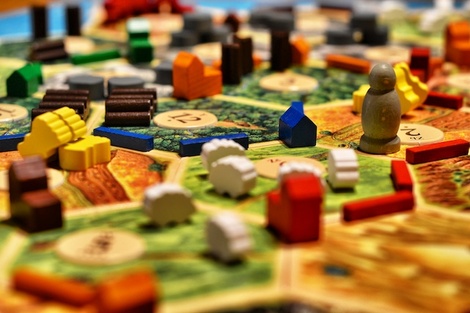
Above is ƒ/4
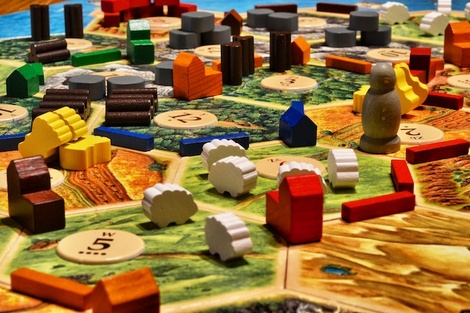
Above is ƒ/16
|
As you can see, ƒ/2 has most of the picture out of focus while ƒ/16 has all if it in focus. This is a very powerful technique when wanting to highlight one aspect in the picture. A small/shallow DOF is usually used in portrait photography when the photographer only wants the person in focus and everything else blurred. It keeps the distracting background and foreground out of the image. On the other side, the large/deep DOF is usually used for product photography when the photographer wants all of the product to be tack sharp for ads in magazines or on the internet.
Circles of Confusion and Bokeh
When a picture is taken and there is clearly parts that are out of focus DOF, the change from sharp and in focus to out of focus is a gradient scale. I tried to capture that with the graphic above. "Circles of confusion" is just a term given to the part of the picture that passes the point from being in focus to out of focus. Another term for the out of focus part is Bokeh. Circles of confusion are not circles either, rather they are the shape of the opening created by the camera's diaphragm however, they are not really all that noticeable unless they are in an image takes with a very small aperture. So a diaphragm that makes the opening into 8 side octagon will have 8 sided bokeh. This is clearly seen with smaller apertures. Very large, wide open apertures will have a creamy bokeh depending on the quality of the lens.
DOF vs Distance
The closer the focal point is to the camera, the less range there is for DOF. What I mean is this, when the subject you focus on is 2 feet away from your camera lens, the DOF at ƒ/22 will be between 1.8' - 2.4'. However, if the focus point was 7 feet away from your camera, the DOF at ƒ/22 will be 5' - 20'. Some lenses have a scale on them to give you a quick idea of what this range is. Below is what some of them look like.
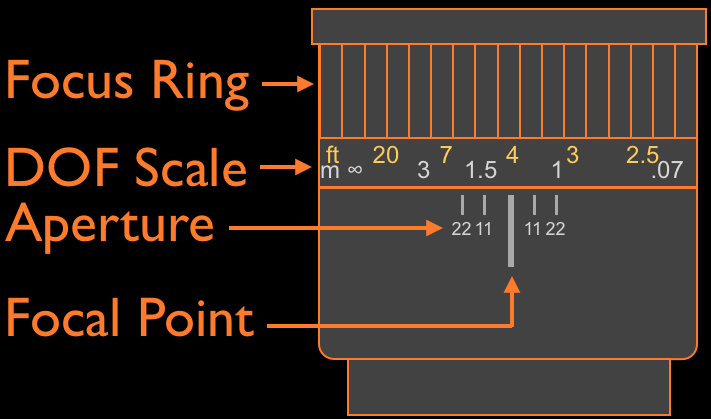
In the example above, the focal point is at the 4 foot mark. The ƒ/22 ticks lands roughly at 3.5 and 6 feet. Therefore, the maximum DOF will be 3.5 - 6 feet. If you want to get an idea of how it will look at ƒ/11 just look at the tick marks denoting that aperture. As the focus ring twists around the lens, so does the DOF scale, therefore the DOF at ƒ/22 will change as well.
If you want even more specifics about DOF distances for your lens it is not going to be as simple as the aperture chart. This is because each focal length has a different scale for each given aperture. If you are wanting to get detailed information on the DOF for your camera and lens combinations you can go HERE and play with the tool they created.
Hyperfocal Distance
Hyperfocal Distance is the focal point (plane) that is the minimum focus distance needed to active acceptable focus out to infinity. It is used by most landscape photographers. Below is an example of how it works.
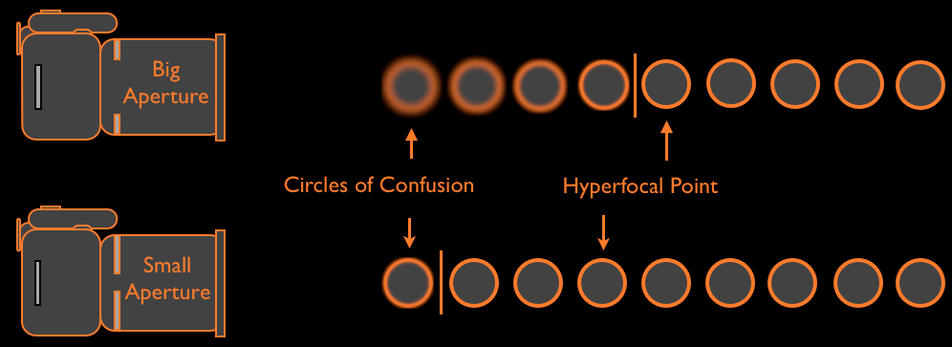
It is important to note how the size of the aperture changes how far out the hyper focal point is. The bigger the aperture the further your focus point will need to be if you want everything in the background in focus. This point changes dramatically as the focal length increases. The longer the focal length, the farther out the hyper focal point is.
So what about landscapes? If you are taking a picture of a mountain that is a couple miles away for even a bridge that is several hundred feet away, hyper focal distance may not be that important for you. The reason being that the point you are focusing at, regardless of aperture, will be beyond the hyperfocus point. Therefore, you could use any aperture you want for these kinds of pictures. But that does not mean aperture is not important for far away objects.
Sharpness
One of the things that affects the sharpness of your image is the aperture you choose and every lens has its own sharpest aperture. Here are some examples illustrating this. They were all taken on a tripod with a Nikon 50mm 1.8. They are not processed in any way. I am showing you what they look like when looking at the image at 100%. See how much sharper there image gets as you move away from both end of the aperture range. I see the sharpest aperture between ƒ/8.
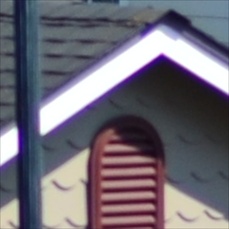
Nikon 50mm 1:1.8 @ ƒ/2
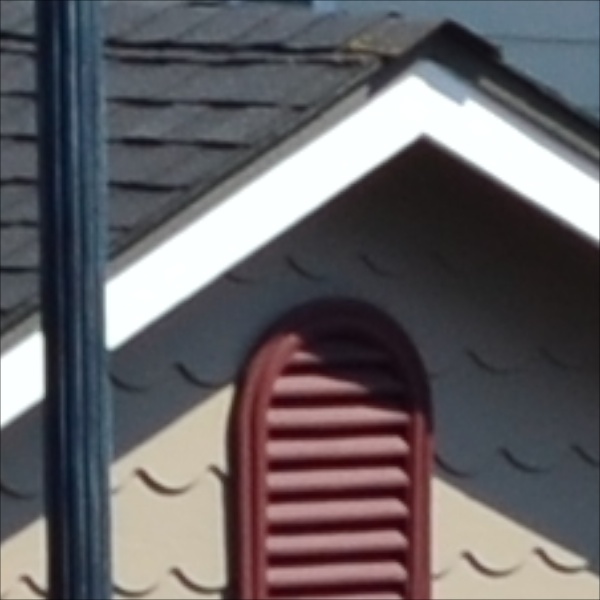
Nikon 50mm 1:1.8 @ ƒ/8
|

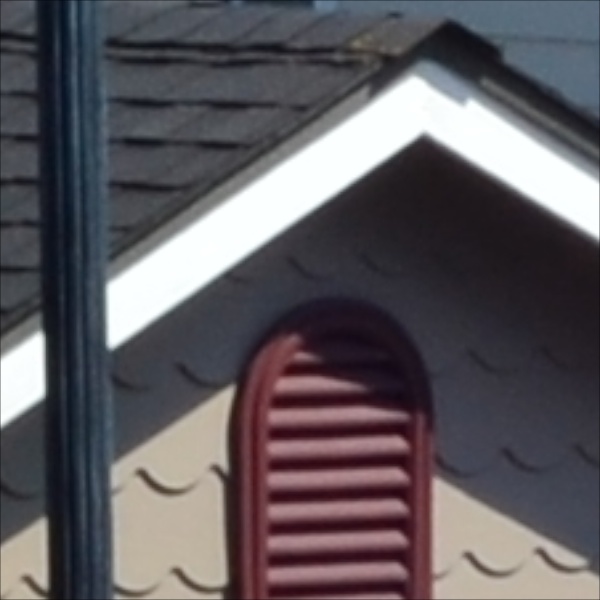
Nikon 50mm 1:1.8 @ ƒ/2.8

Nikon 50mm 1:1.8 @ ƒ/11
|

Nikon 50mm 1:1.8 @ ƒ/4
Nikon 50mm 1:1.8 @ ƒ/16
|
Nikon 50mm 1:1.8 @ ƒ/5.6
Nikon 50mm 1:1.8 @ ƒ/22
|
It is a good idea to see for yourself what the sharpest aperture is for each of your lenses. Look at the center as well as the corners of the image. Also, if you are using a zoom lens, the sharpest aperture will change as you move through the focal length range. Write down what you have observed. There is no shame in a cheat sheet. If you really want your landscapes to be sharp, and can afford to choose the aperture of your choice, then pick the sharpest one!
That's it! You now know pretty much all you need to know about apertures on camera lenses.
That's it! You now know pretty much all you need to know about apertures on camera lenses.
All photos and content are copyright © Ian Dalton 2014
